Taking hoof photos might sound simple, but doing it well is a true art form. When done incorrectly, even slight changes in angle, lighting, or position can make the hoof appear drastically different than what we see in person, leading to confusion or even misinterpretation of progress. When taking photos to determine hoof boot sizing, a change in angle or orientation of the camera to the hoof can mean ending up with boots that don’t fit your horse. If you’ve ever taken hoof photos that didn’t seem “quite right,” or if you weren’t sure what made a comparison photo misleading, this guide is for you.
General Tips for All Hoof Photos
- Start with a clean area, with good (ideally natural) light.
- Clean out the hooves well with a hoof pick and wire brush before starting.
- Take your photos on flat, level ground with the horse standing square.
- Take multiple angles (we’ll cover the key ones below).
- Always check your photo after taking it, and if it’s not quite what you were looking for, retake if needed.
- Use a phone or camera lens held approximately around 50 cm / 2 feet away from the hoof to reduce distortion.
Let’s go through the most important hoof photo angles and how to capture them accurately.
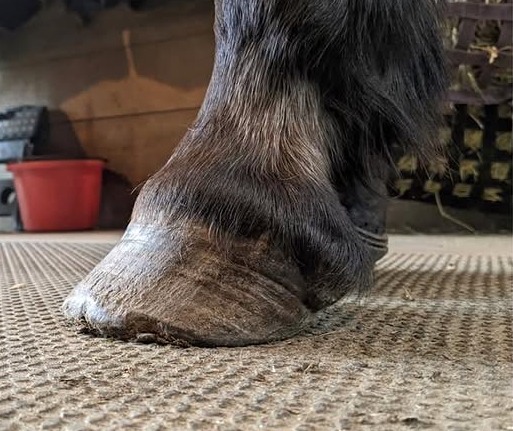
Lateral View (Side View)

The lateral view gives us a profile of the hoof and is one of the most important photos for noting toe length, heel angle, and overall hoof capsule shape. However, it’s also one of the most frequently misrepresented.
To take a true lateral:
- Position your camera on the ground, about 50 cm / 2 feet away from the hoof.
- Make sure the camera lens, if using your phone, is toward the top of the phone and not closest to the ground to avoid the camera trying to focus on the ground itself and not the hoof.
Slide your camera from behind the hoof toward the front until the inside heel bulb disappears behind the outside heel bulb. This ensures you’re perpendicular to the limb and the photo will be a true lateral.
The lateral view gives us a profile of the hoof and is one of the most important photos for noting toe length, heel angle, and overall hoof capsule shape. However, it’s also one of the most frequently misrepresented.


Even slight changes in this angle can create misleading images, making the toe look longer or the heel more underrun than it really is. Consistency here is key for accuracy of assessment.
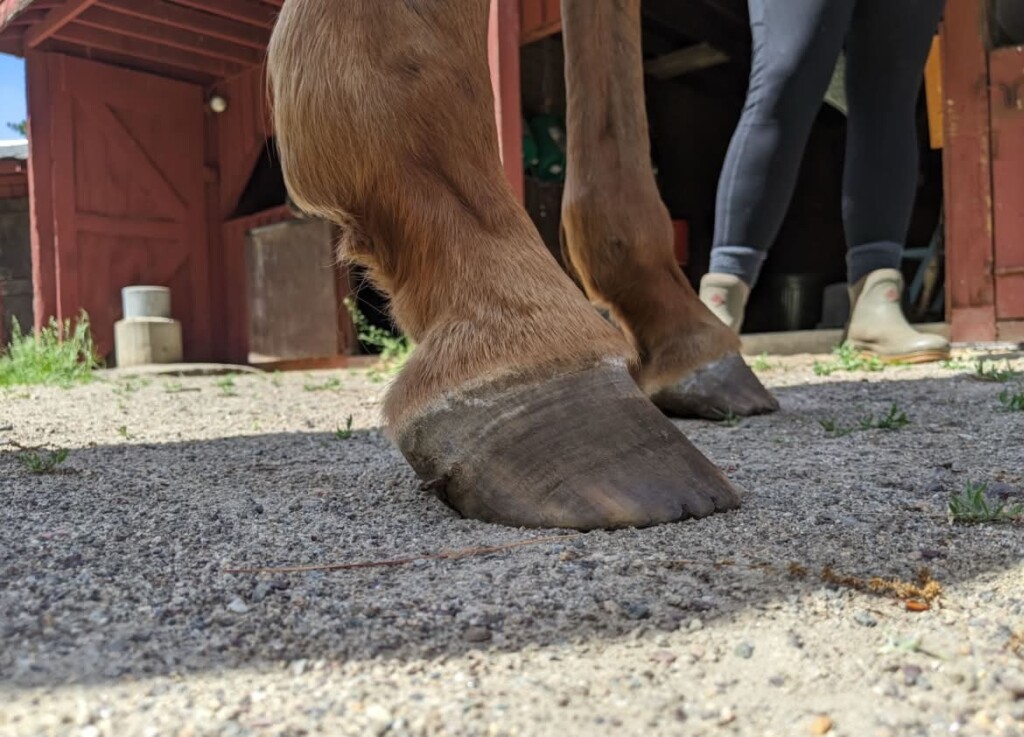
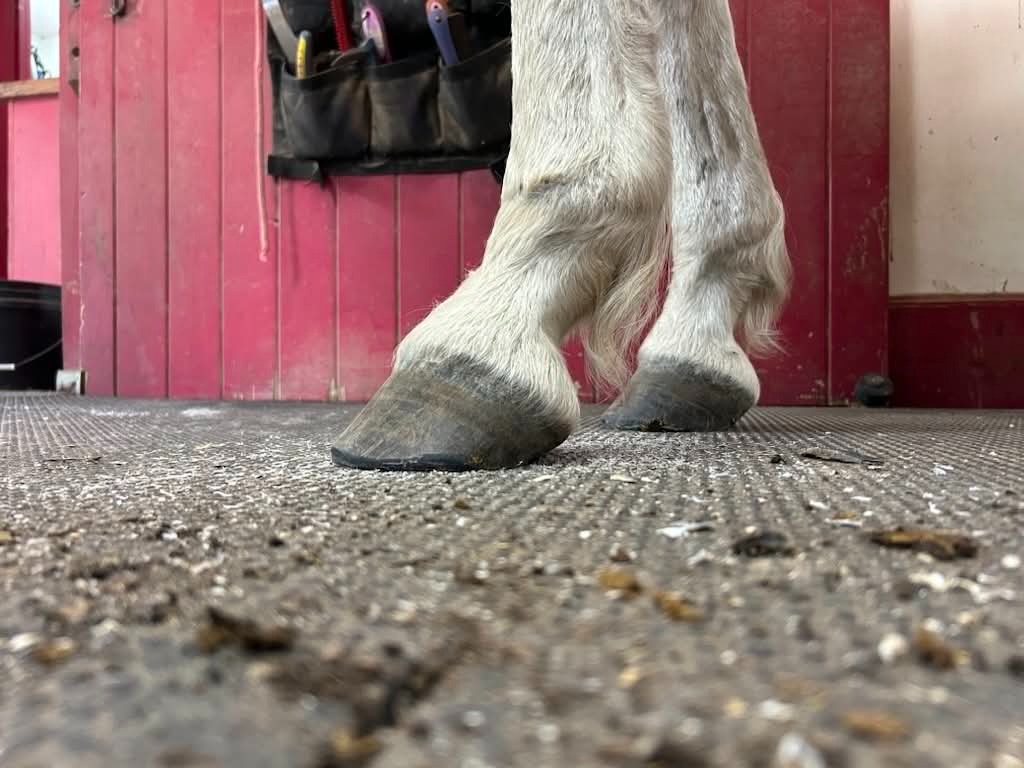
Dorsal View (Front View)

The dorsal view shows the front of the hoof and is useful for evaluating flaring, distortion, and hoof symmetry. This view can reveal issues like conformational concerns up the limb, or medial-lateral imbalance.
When taking a dorsal photo:
- Line the camera up with the center of the hairline at the toe, not just by following the leg down. Remember, the hoof may not be aligned perfectly with the leg.
- Again, hold the camera about 50 cm / 2 feet away and level with the front of the hoof.
- Make sure the horse is standing square, with weight evenly distributed.
This view becomes especially helpful in cases where the horse has a flare or distortion that might be linked to internal hoof structure changes.

Caudal View (Rear View)

The caudal view, or view taken from above the heel bulbs, is essential for evaluating the health and balance of the heel bulbs, frog, and heel height. This view can also help detect thrush, central sulcus infections, and heel contraction.
Here’s how to take it:
- Pick up the hoof and hold it loosely by the fetlock within its own range of motion, allowing the foot to hang naturally.
- Center your camera between the heel bulbs, keeping it level with an imaginary line down the middle of the pastern and through the heel bulbs.
- You should be able to see a small sliver of sole between the heels, enough to evaluate heel depth and symmetry.
- For deeper assessment, take two caudal views:
- One showing heel height in relation to the limb.
- One focused more closely on the frog and central sulcus.
- One showing heel height in relation to the limb.
This view can be tricky but is incredibly revealing when tracked over time.
Oblique View (Angled Sole Shot)

The oblique view is especially helpful for evaluating sole depth and concavity. This view can provide valuable context when taken properly.
To take an oblique view:
- Pick up the hoof and stand beside the limb.
- Hold the camera just above the lateral (outside) heel, and angle it diagonally toward the medial (inside) toe. You should be just above the sole, but not too high that you can’t see the concavity (or lack thereof) of the hoof itself.
- You should be able to visualize the depth and curvature of the sole from this angle.
It can take practice to get this shot right, so don’t stress if it takes a few tries. It’s well worth it when assessing concavity during rehab.
Solar View (Bottom of the Hoof)

The solar view gives you a clear look at the bottom of the hoof and is key for assessing the frog, white line, symmetry, and sole shape.
To get a good solar photo:
- Pick up the foot and support the front (dorsal wall) of the hoof in your hand.
- Hold the camera directly parallel to the sole, fitting the entire hoof in the frame of the camera.
- Avoid tilting the camera forward or backward, as this will distort toe length or frog size.
Check to make sure the image captures the entire sole, including heels, bars, frog, and toe.

After taking photos, don’t forget to review each one before moving on to the next foot. It’s worth taking a second shot if the first isn’t usable. Once you’ve taken all angles, be sure to organize them in a way that lets you track progress:
- Create albums by horse name and date.
- Include notes about any observations or changes.
- Consider using apps like HoofmApp, Dropbox, or your phone’s photo album to keep track.
If you’re working with other professionals, like a vet, bodyworker, or trainer, having organized hoof photos can open up more productive conversations and help spot connections between hoof health and movement or comfort changes.
Taking good hoof photos isn’t just about aesthetics, it’s a powerful tool in rehab, comfort tracking, and building a full picture of your horse’s health. Proper photos can also help you decide the best fitting hoof protection, and with consistent angles, accurate positioning, and clear organization, you’ll set yourself up to better understand what’s working, what’s not, and how your horse is progressing in hoof health.
So grab your phone, grab your horse, pick up those hooves, and start snapping. With some practice, your hoof photo game will become one of the most valuable parts of your hoofcare toolkit.